How to set up Business Manager, the pixel and the Conversions API from zero
By The Clear Path Media House team · · 6 min read
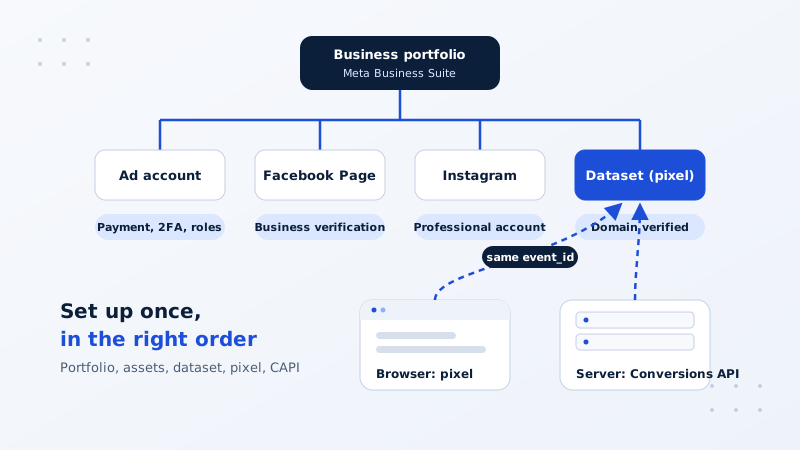
Most of the broken Meta accounts we inherit were not broken by bad campaigns. They were broken on day one by setup done in the wrong order: an ad account created from a personal profile, a Page nobody can access because the employee who made it left, two pixels firing on the same site, a Conversions API integration sending duplicate purchases. This is the order we follow when we start a client from nothing. It takes a few hours spread across a few days, mostly waiting on verifications, and it saves months of confusion later.
Start with the business portfolio, not the ad account
Everything in Meta's advertising system hangs off a business portfolio, the thing most people still call Business Manager, which now lives inside Meta Business Suite. Create it first, in the company's legal name, using a company email address and a personal profile that belongs to an owner or a long-tenured manager. Meta requires a real personal profile as administrator; pick one that will not disappear with staff turnover, and add a second admin immediately.
Turn on two-factor authentication for every person added. Assign roles by job: full control for owners, partial access with specific asset permissions for staff. If an agency manages your ads, grant partner access to their business portfolio instead of creating logins for their staff; you can revoke it in one click later.
Then begin business verification. Meta asks for documents that match the business name and address, and review can take days. Starting now means it is finished before you need it for certain ad categories, higher limits or Meta Verified for business.
Add the ad account, Page and Instagram the right way
Create the ad account from inside the portfolio, never from a personal profile. Set the time zone and currency carefully, because they cannot be changed later; a wrong time zone means every daily report is misaligned forever. Add a company payment method and set a billing threshold and an account spending limit you are comfortable with.
Create or claim the Facebook Page from the portfolio too. If a Page already exists under an employee's profile, have that person assign the portfolio as owner before anything else. Convert your Instagram account to a professional account, link it to the Page, and add it to the portfolio. Ads that run on Instagram placements without a linked account use a placeholder identity, which looks wrong and costs trust.
Check Account Quality in Business Suite before launching. New ad accounts have no history, so keep early creative free of aggressive claims and keep the payment method healthy; a declined card on a new account can trigger restrictions that take weeks to appeal.
Verify your domain and create one dataset
In the portfolio's brand safety settings, verify the domain where conversions happen. Use the DNS method if you can; it survives website rebuilds. Domain verification is what lets you set event priorities for aggregated event measurement and edit link previews, and it ties your conversion data to a domain you control.
Then open Events Manager and create a single dataset. A dataset is the container for what used to be called the pixel; it holds the pixel ID, the Conversions API connection and any app or offline events. One business, one website, one dataset. Multiple pixels on one site are the most common source of inflated or contradictory numbers we find, and consolidating them later is painful. Name the dataset after the domain and share it with the ad account.
Install the pixel through a tag manager
Install the base pixel code through Google Tag Manager rather than pasting it into the site theme. A tag manager lets you add, fix and remove events without touching the site, and it keeps GA4, the pixel and future tags in one place with version history.
Fire the base code on every page. Then add the standard events that match your funnel: ViewContent on product or service pages, AddToCart and InitiateCheckout for stores, Lead or Schedule for service businesses, Purchase with value and currency on the confirmation page. Pass the parameters Meta expects, such as content IDs for catalog matching and customer information for event match quality. Each event should fire once per action. Test with the Meta Pixel Helper extension and watch the Test Events tab in Events Manager while you click through the site on a phone.
Platform-native integrations on Shopify, WooCommerce and others can install the pixel for you. They are convenient, but check exactly what they fire and never run them alongside a tag manager installation of the same events.
Add the Conversions API and deduplicate
The Conversions API sends events from your server to Meta directly, so conversions are recorded even when a browser blocks the pixel or a user closes the tab before it fires. In 2026 it is not optional; accounts without it under-report and under-optimize.
There are three routes. Many commerce platforms have a native Conversions API integration you can enable in a few clicks. Tag manager users can run a server container that forwards events. For custom sites, a developer sends events from the back end following Meta's documentation. Whatever the route, every event sent through both the pixel and the Conversions API must carry the same event_id and event_name so Meta can deduplicate. Without that, every purchase counts twice and the delivery system learns from a fiction.
Send customer information parameters, such as hashed email, phone, name, location, client IP address and user agent, to raise event match quality. Events Manager shows a match quality score per event; aim to raise it steadily, because higher match quality means more conversions attributed and better optimization.
Check Events Manager before you launch
Before the first campaign, spend thirty minutes in Events Manager. Confirm each standard event arrives from both browser and server with a healthy deduplication rate. Set your aggregated event measurement priorities for the verified domain, with the conversion you will optimize for at the top. Create custom conversions if you need to optimize toward a specific page or parameter. Then make a test lead or purchase on a phone and watch it arrive in Test Events with its parameters intact.
Document everything: portfolio ID, ad account ID, dataset ID, who holds which role, which events fire where and from which tag. The document is what makes the account recoverable when a person leaves or a site is rebuilt. Meta's Business Help Center and the Conversions API documentation cover current interface details, which change often. The order above does not.
Key takeaways
- Create the business portfolio first, with two admins, two-factor authentication and business verification started.
- Create the ad account, Page and Instagram from inside the portfolio; time zone and currency are permanent.
- Verify the domain, then create exactly one dataset for the pixel and the Conversions API.
- Install the pixel through a tag manager and fire each standard event once, with parameters.
- Add the Conversions API with a shared event_id for deduplication and send customer parameters for match quality.
- Check Events Manager and document the whole setup before the first campaign.
Setup is included in every engagement we run, and we also offer it as a stand-alone launch project. If you would rather not spend your week in Events Manager, send us a note and we will take it from here.